Category: Uncategorized

  • What Size Should a Custom Cookie Cutter Be? A Sizing Walkthrough

    What Size Should a Custom Cookie Cutter Be? A Sizing Walkthrough

    Size is the first decision that quietly shapes every other choice in a custom cookie cutter, and it is the one buyers most often get wrong. Pick a width before you have thought about the finished cookie, and you can end up with a shape that is too cramped to hold detail, too large to package neatly, or too small to read the design you paid to have cut. The good news is that sizing is not guesswork. A handful of common width bands cover almost every order, and each one carries predictable trade-offs in detail, yield, and cost. This walkthrough moves through those decisions in the order that actually matters.

    Start with the finished cookie, not the cutter

    A cutter’s stated size is its outside width at the widest point, and the baked cookie will read slightly larger than that because dough spreads during baking. Before you specify a dimension, picture where the cookie ends up. A single cookie sold at a bakery counter, a favor tucked into a cellophane bag with a ribbon, and a logo cookie handed out at a trade show all want different footprints. Decide the destination first, then work backward to a width. If the cookie has to sit inside a standard 3 by 3 inch favor bag, for example, the cutter should land closer to 2.5 inches so the baked cookie still clears the seal.

    The width bands buyers actually order

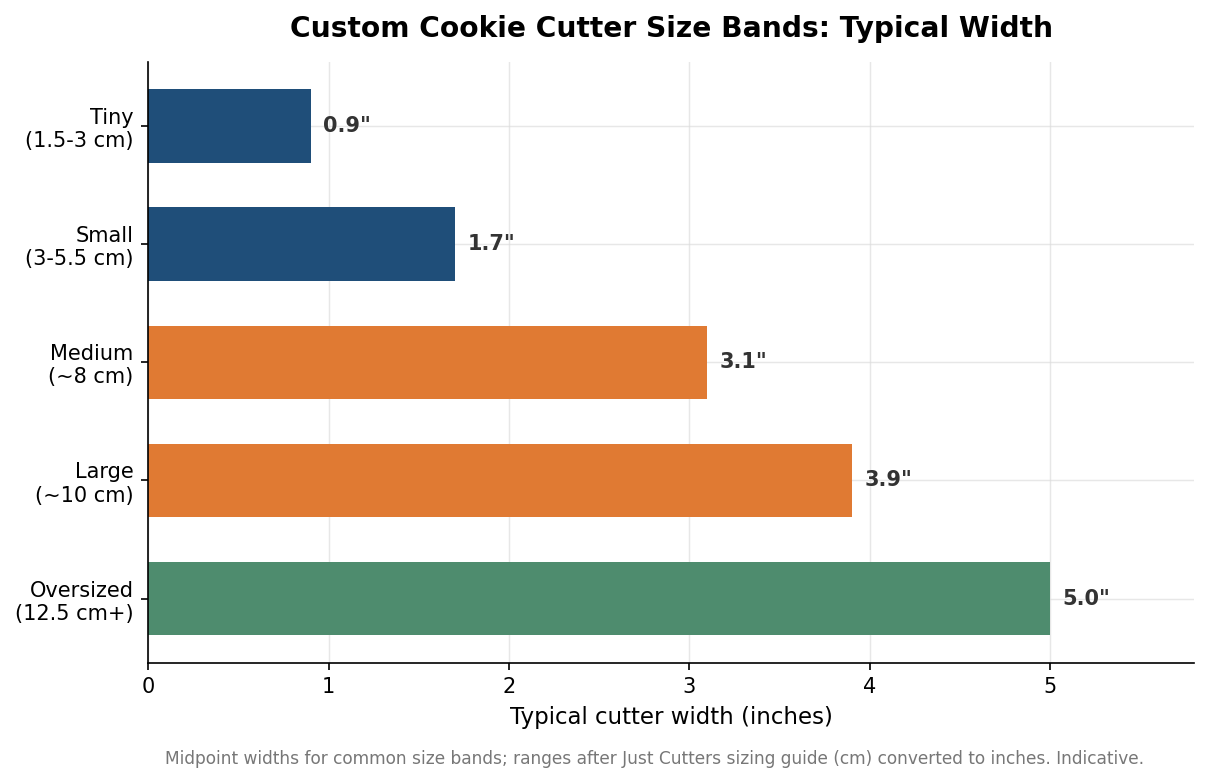
    Most custom work falls into five bands. Tiny cutters run roughly 1.5 to 3 centimeters, about 0.6 to 1.2 inches, and suit accents like drink charms or a cluster of small shapes on one plate. Small covers 3 to 5.5 centimeters, or 1.2 to 2.2 inches, the sweet spot for favors and multi-piece sets. Medium sits near 8 centimeters, about 3.1 inches, which is what most people picture as a standard cookie. Large is around 10 centimeters, close to 3.9 inches, and reads well as a centerpiece or a single retail cookie. Oversized begins near 12.5 centimeters, roughly 5 inches and up, for statement pieces and platters. Those centimeter ranges follow published sizing guides such as the one from Just Cutters; the inch figures are conversions, so treat them as close rather than exact.
    Horizontal bar chart of typical custom cookie cutter widths by size band in inches
    Five common size bands and their typical widths, converted from centimeter sizing guides.

    How size limits the detail you can keep

    Detail does not shrink at the same rate the shape does. A logo that looks crisp at 4 inches can lose its interior lines entirely at 1.5 inches, because the thinnest wall a cutter can hold has a floor. On 3D printed cutters, cutting edges are often modeled around 0.8 millimeters, and fine internal features generally need to stay above roughly 1.5 to 2 millimeters or they either fail to print or tear the dough. Stamped metal cutters bend a flat strip, so tight interior curves and sharp inside corners are constrained by how far the strip can fold. The practical rule is that the smaller you go, the simpler the outline has to be. If a design carries text or intricate interior cuts, size up until those features clear the minimum, or plan to deliver the detail with a separate stamp or a debossing plate rather than the cutting edge itself.

    Depth, dough thickness, and wall specs

    Width gets the attention, but depth and wall thickness decide whether a cutter is pleasant to use. Testing that circulates among 3D printing guides points to about 3/16 inch, near 4.5 millimeters, as a reliable rolled-dough thickness for shapes that hold their edges. A cutting wall in the range of 1.5 to 2 centimeters tall, roughly 0.6 to 0.8 inch, clears that dough comfortably and gives fingers something to push on; taller walls only help when you are cutting deep dough or firm fondant that needs a longer release. Body walls on printed cutters commonly run around 1.5 to 2 millimeters for rigidity, while the cutting edge stays thin. On materials, food-safety write-ups favor FDA-recognized options such as PLA without additives or stainless steel and steer away from ABS, which can shed unwanted compounds. Because printed layers leave small crevices that are hard to scrub, many bakers treat intricate printed cutters as light-duty tools, cleaning them promptly by hand rather than trusting a dishwasher.

    Matching size to the job

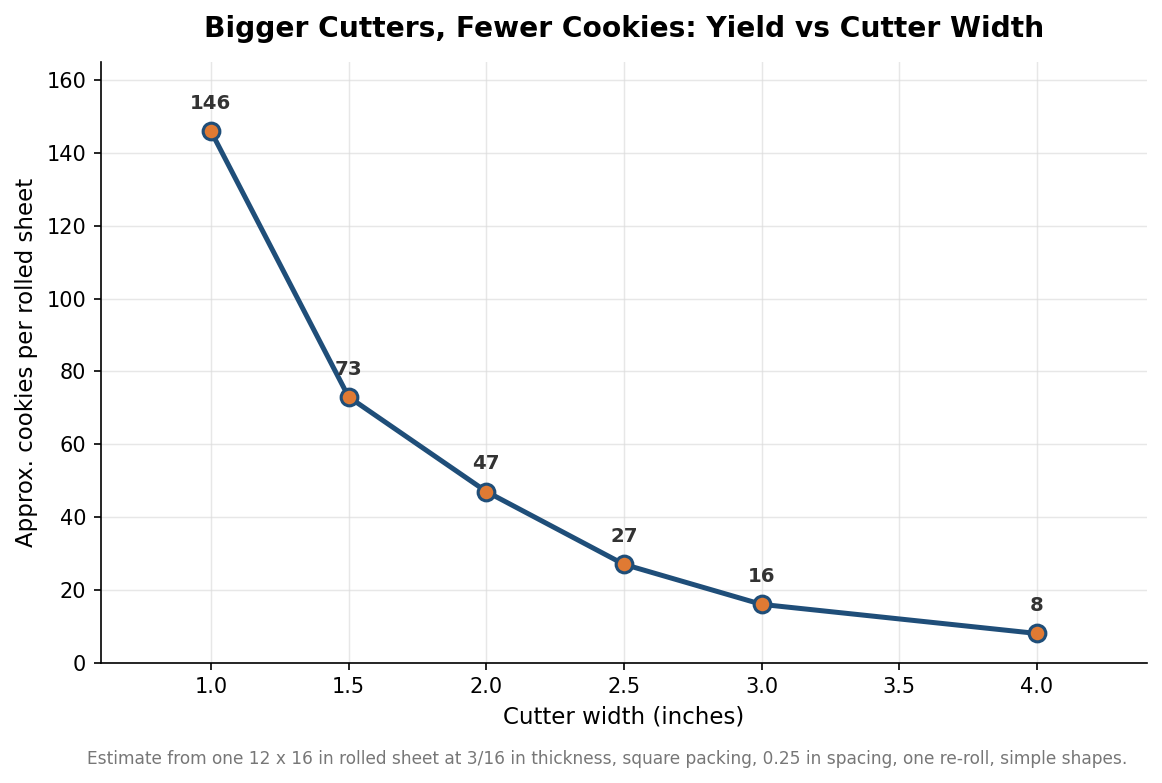
    Yield is where size quietly meets budget. Because area grows with the square of width, a modest jump in size cuts the number of cookies you get from a single rolled sheet far faster than most people expect. The chart below estimates cookies from one 12 by 16 inch sheet at 3/16 inch, and the curve is steep: a 1 inch cutter can clear well over a hundred pieces per sheet, while a 3 inch cutter drops to the teens. Those figures assume simple shapes, square packing, a quarter inch of spacing, and one re-roll, so read them as a planning estimate, not a promise. The takeaway holds regardless of the exact count. Favors and giveaways, where you need volume and low unit cost, reward staying in the small to medium bands. Retail and centerpiece cookies, where each piece carries the impression on its own, justify large or oversized widths and the lower yield that comes with them.
    Line chart showing approximate cookies per rolled dough sheet falling as cutter width grows
    Yield drops sharply as cutter width grows because area scales with the square of width.

    Put those pieces together and a size specification stops being a guess. Name the finished use, pick the band that fits the package and the audience, confirm the design’s smallest feature clears the minimum for your chosen material, and set dough at about 3/16 inch so the shape bakes the way it cut. Lead times on custom cutters commonly land in the one to three week range depending on whether the shape is tooled or printed, and per-unit cost falls as quantity rises, so it is worth settling size early enough to order once rather than twice.
  • Turning a Logo Into a Cookie Cutter: A Design Spec Guide

    Turning a Logo Into a Cookie Cutter: A Design Spec Guide

    Handing over a logo and expecting a cookie cutter back is where a lot of custom orders go sideways. A logo is a flat image with no thickness rules, while a cutter is a physical object that has to slice dough cleanly, survive a dishwasher, and release a cookie in one piece. The translation between the two is where the real design work happens, and understanding it before you order saves a round of disappointing samples. This is a walkthrough of the specifications that actually decide whether your artwork becomes a cutter that works.

    The core idea: a cutter can only reproduce detail down to the size its walls and cutting edge can physically hold, and everything about the artwork, the wall, and the height has to respect that limit. Fight it and you get a fragile cutter that tears dough; work with it and even a fairly detailed mark can become a clean, reusable cutter.

    A logo is not automatically a cutter

    The first thing to accept is that the outline is what cuts, not the fill. A cutter traces the edge of a shape, so a logo that reads by color blocks or gradients has to be reduced to a single clean silhouette before it means anything as a cutter. That reduction is a design decision with consequences: a wordmark with fine serifs, a badge with an inner ring, or an icon with several disconnected pieces will not survive the trip unchanged. The best candidates are marks with thick shapes, a clear single outline, and limited tiny text. If your logo depends on small interior lettering to be recognizable, plan on either enlarging the whole cutter or accepting that the text will be dropped.

    What the process can and cannot hold

    Every manufacturing method has a smallest feature it can reproduce, and detail below that size simply fails, either not printing or crumbling in use. Hairline strokes, tiny protrusions, and interior lettering are the usual casualties. Designs made of many separate islands are another trap, because each disconnected piece needs its own structure to stay attached. The practical move is to simplify tiny details before the artwork is ever exported: thicken thin lines, merge shapes that nearly touch, and drop elements that would end up smaller than a grain of rice on the finished cutter. Scaling the whole design up is the honest fix when a design has more detail than the process can hold; shrinking the cutter to save dough is what forces the detail below the limit in the first place.

    Horizontal range bars of typical cookie cutter blade dimensions in millimeters for wall, top edge, and cutting edge
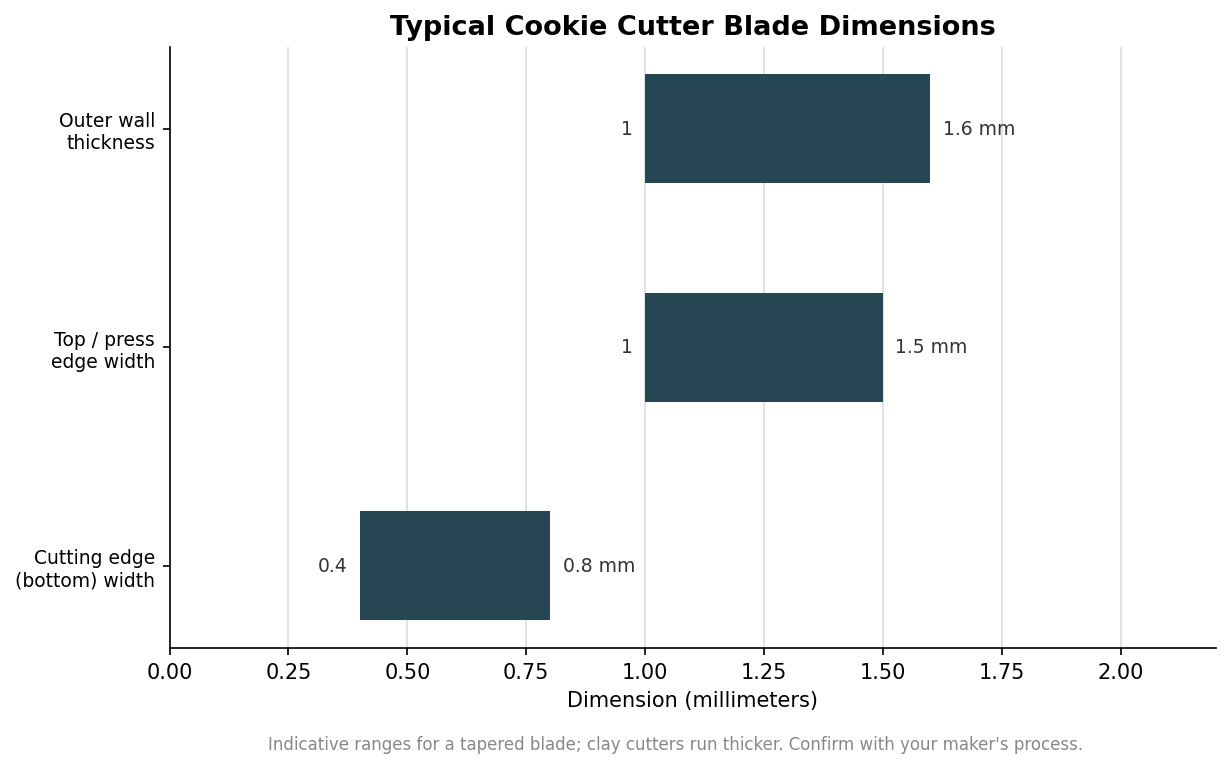
    A working cutter uses a tapered blade: a wider top to press on, narrowing to a thin cutting edge; clay cutters run thicker.

    Wall thickness and cutting edge: the structural spec

    Underneath the artwork is a cross-section that most buyers never see but that determines whether the cutter lasts. A typical cutter uses a tapered wall: wider at the top where you press, around one to one and a half millimeters, narrowing to a thinner cutting edge at the bottom, roughly four-tenths to eight-tenths of a millimeter, so it slices rather than crushes. The outer wall itself usually runs in the range of about one to one and a half millimeters for a baking cutter, and thicker, closer to one and a half to two millimeters, for clay or fondant cutters that take more force. Those numbers are indicative and vary by maker and material, but the principle is fixed: too thin and the cutter is fragile, too thick and it mashes the dough edge instead of cutting it.

    Scatter plot with ranges showing recommended cutter height increasing with rolled dough thickness
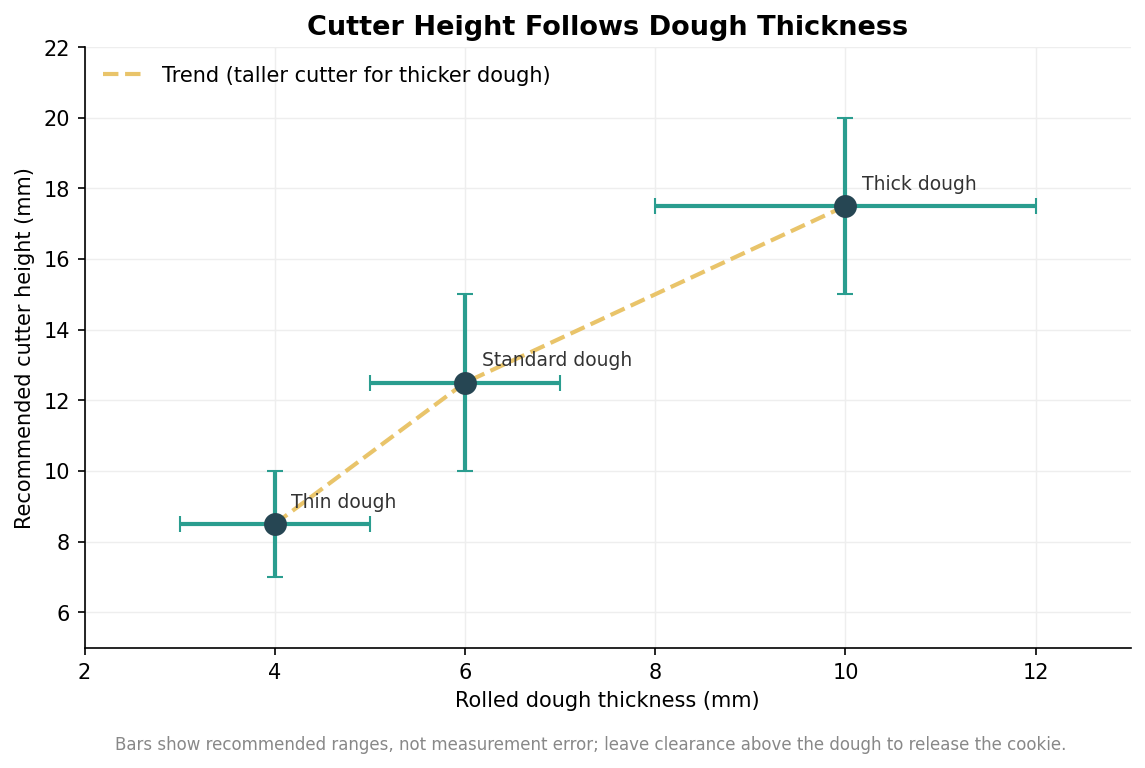
    Cutter height scales with dough thickness, with extra height above the dough for grip and clean release.

    Height follows the dough

    Cutter height is not a style choice; it follows how thick you roll your dough. As a rough guide, thin dough of three to five millimeters pairs with a cutter around seven to ten millimeters tall, standard dough of five to seven millimeters wants ten to fifteen millimeters of height, and thick dough of eight to twelve millimeters needs fifteen to twenty. The extra height above the dough line is deliberate: it gives you something to grip and leaves clearance so the cookie can push back out instead of jamming. A cutter that is exactly as tall as the dough is thick is miserable to use, so err toward the taller end of the range for the dough you actually roll.

    Split the work, and prep the artwork

    When a design carries more detail than an outline can hold, the professional answer is to split the job. The cutter handles the outer silhouette, and a separate stamp or embosser presses the fine interior detail, the fine lettering, facial features, or inner lines, into the surface of the cut cookie. That division lets you keep detail that would be impossible to cut, and it is often why a decorated custom cookie looks sharper than a single cutter could ever manage. If the interior detail is the whole point of your design, ask about a cutter-and-stamp set rather than trying to force everything into one edge.

    Finally, give the maker artwork it can use. High-contrast, dark-on-white line art reproduces far better than a screenshot, a low-resolution photo, or anything with shadows, gradients, or blurry edges. Clean vector outlines are ideal, since they scale without losing definition. Do the simplification on your end before sending, rather than hoping the manufacturer will guess which tiny elements you are willing to lose. Get the artwork clean, respect the minimum detail the process can hold, set the wall and edge for durability, and match the height to your dough, and the cutter that comes back will look like your mark and actually cut a cookie you can decorate.